 The yarn was the inspiration. Noro Silk Garden is the softest yarn with the most interesting colours, and I found such a great deal on the Chunky version at the Needle Emporium this year, I could not resist... I have loved the idea of an oversized lapel that folds on itself in waves and designed this coat to do just that. Using the seed stitch allows it to look the same whether right side is facing or wrong side as it folds back and forth. It also leaves a nice flat finish to the edge. No need to add a ribbed edging to finish the garment! You could use a shawl pinto close this in many ways, but mostly I like it just open and free flowing.
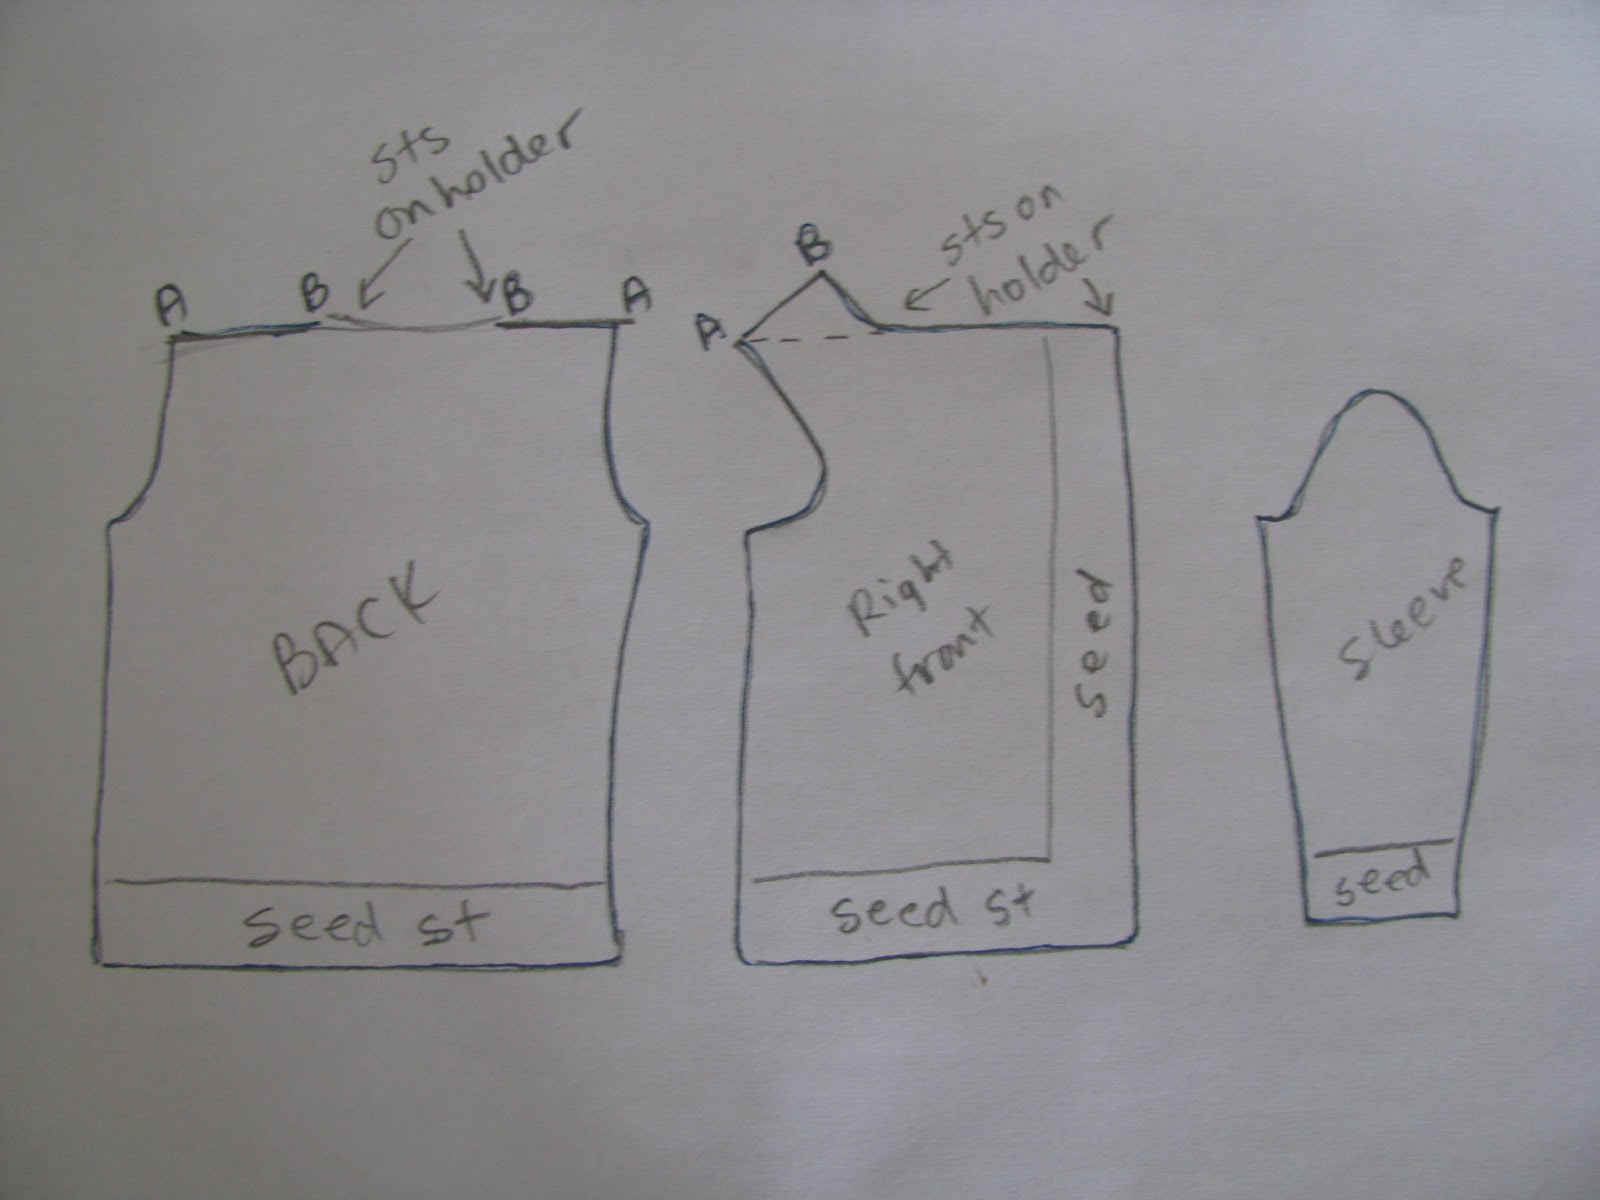
The unusual shoulder shaping on the front is intentionally designed to
add to the drape of the lapel. It
creates more folds in the way the front hangs.
See the drawing for details.
Chunky Silk Garden Coat
Size: xSmall[Small, Medium, Large, xLarge] actual size of oversize coat: 32”[36”, 40”, 44”, 46”] measured at bustline.
Yarn: Noro Silk Garden Chunky: 13[15, 16, 17, 19] balls, Shown in colour 6 (45% silk, 45% kid mohair, 10% wool. 50 gram balls- 60 meters)
Needles, 6mm (US 10) Preferably circular but knit without joining in circle. It makes it easier to knit the collar. *** or size to achieve exact gauge AFTER knitting a swatch and washing in gentle cold water. Lie flat to dry then measure.
Gauge: 11 sts = 4 inches. (knit in stocking stitch)
Stitch holders
Stitch holders
Seed Stitch: Row 1: [Knit one, purl one] repeat across the
row. Row 2: purl the knits and knit the purls. Repeat rows 1 &
2 for the pattern.
Stocking Stitch: Row 1: knit all stitches. Row 2, purl all the
stitches.
Back: Cast on 44[50, 55, 60, 64] stitches. Work in seed stitch for 3 inches. Change to stocking stitch and continue until the piece measures 13[14, 14, 15, 15] inches.
Shape armhole: Bind off 5 stitches at beginning of next 2 rows. Decrease one stitch each side every other row 3[3, 4, 4, 4] times. Work straight until total length is 22[23, 23, 24, 24] inches.
Shoulder: bind off 7[9, 9, 11, 13] stitches at the start of next 2 rows. Place remaining 14[16, 19, 20, 20] stitches on a stitch holder.
Right front: Cast on 36[38, 41, 41, 44] stitches. Work in seed
stitch for 3 inches. Next row (right side facing) work 12 stitches in
seed stitch, place marker, work the rest in stocking stitch. Continue to work
the front center edge with 12 seed stitch, and the rest in stocking stitch AND
AT THE SAME TIME increase one stitch every 2 inches at the center front
edge only. Incorporate that stitch into the 12 seed stitch pattern and
move the stitch marker over, converting the 13th stitch into stocking stitch as
you do. Make 6 increases like this then continue evenly for the rest of
the front. (still keeping the 12 seed stitch edge)
Work like this until the piece is 13[14, 14, 15, 15] inches long from start.
Armhole: Bind off 5 stitches at start of wrong side. Bind off one stitch at armhole edge 2 times more. CONTINUE TO WORK THE 12 STITCH SEED STITCH BAND. Work even until 4 inches from the start of armhole decreases. Begin increases: cast on one stitch at start of armhole edge, every other row until 9 increases have been made. Work one row until wrong side is facing you (starting at armhole edge.) Make shoulder extension: Purl across 16[17, 18, 19, 20] stitches . Place rest of stitches on a stitch holder. Right side facing: Knit 2 together, knit to last 2 stitches, knit 2 together. Next row purl. Continue to knit 2 together at start and end of each right side row until one stitch is remaining and fasten off. (see drawing – you are making the triangular shoulder extension)
Work left side:
Cast on 36[38, 41, 41, 44] stitches. Work in seed stitch for 3
inches. Next row (right side facing) work 24[26,29,29,32]sts in stocking
stitch, place marker, work the rest in seed stitch. Continue to work the front
center edge with 12 seed stitch, and the rest in stocking stitch AND AT THE
SAME TIME increase one stitch every 2 inches at the center front edge
only (the seed stitch edge). Incorporate that stitch into the 12 seed
stitch pattern and move the stitch marker over, converting the 13th stitch into
stocking stitch as you do. Make 6 increases like this then continue
evenly for the rest of the front. (still keeping the 12 seed stitch edge)
Work like this until the piece is 13[14, 14, 15, 15] inches long from start.
Armhole: Bind off 5 stitches at start of right side. Bind off one stitch at armhole edge 2 times more. CONTINUE TO MAINTAIN THE 12 STITCH SEED STITCH BAND AT THE CENTER FRONT. Work even until 4 inches from the start of armhole decreases. Begin increases: cast on one stitch at start of armhole edge, every other row until 9 increases have been made. Work one row until right side is facing you (starting at armhole edge.) Make shoulder extension: Knit across 16[17, 18, 19, 20] stitches . Place rest of stitches on a stitch holder. Purl one row. Right side facing: Knit 2 together, knit to last 2 stitches, knit 2 together. Next row purl. Continue to knit 2 together at start and end of each right side row until one stitch is remaining and fasten off. (see drawing – you are making the triangular shoulder extension)
Sew shoulder seams (drawing : match A to A and B to B and sew in between)
With circular needle, pick up the stitches from right front holder, pick up 8[9,9,10,10]sts from right shoulder extension, sts from back holder, 8[9,9,10,10] sts from left front shoulder extension, then sts from left front holder.
Work seed stitch across the collar, back and forth until 2.5 inches are worked, then cast off all stitches in seed stitch.
Sleeves: (make two) Cast on 26[28,30,30,32] stitches, Work in seed stitch for 3 inches.
Work in stocking stitch, increasing one each side, every 6 rows 10 times. Continue without increasing until total length is 15 inches (or whatever length you would like).
Cap shaping: Bind off 5 stitches at start of each row. Decrease one each side every other row 8 times, then one each side EVERY row 3[3,4,4,4] times. Bind off 2 stitches at the start of next 4 rows, then bind off all remaining stitches.
Sew cap of sleeve into armhole curve of front/back.
Sew sleeve and side seams. I like to wash gently in cold water and lay flat to dry... this softens the garment and gives a nice halo to the fabric. This also makes it a little more relaxed and bigger, so keep it in mind for sizing. The coat I made has long enough sleeves to roll up. You could make the sleeves shorter if you don't want the rolled cuff.


 Me with some Preemie Caps ready to go...
 The amazing Jane...


